An SSD or a Solid State Drive offers the best performance compared to the Hard Disk Drive (HDD). This is because of the high data transfer speed of an SSD. An SSD boosts a computer’s performance but its speed can also vary in different scenarios. In this article, we will show you how to run an SSD performance test or SSD speed test on a Windows PC.
Guide on SSD speed test on Windows computers
You can check your SSD speed by using different tools. Windows computers also have a built-in tool to check SSD speed. There are many benefits of performing an SSD performance test. With time the performance of your PC is affected. You may experience a slow performance of your PC. One possible reason for this issue is the fragmentation in the hard drive. An SSD performance test will let you know at what speed your SSD is running so that you can optimize it (if necessary).
You can test the speed of your SSD via the following two methods:
- Using SSD speed test software
- Using Windows built-in disk speed test tool
Use third-party SSD speed test software
There are many tools available that allow you to test the performance and speed of your Solid State Drive. We will discuss the following three tools in this article:
- CrystalDiskMark
- EaseUS Partition Master
- Blackmagic Disk Speed Test
Let’s see how to use all these tools to check SSD speed.
1] Use CrystalDiskMark
CrystalDiskMark is one of the popular tools to check SSD speed test. It is a hard disk benchmarking tool that performs different tests on your hard disk to test its performance and speed. You can download it from its official website. It has a simple user interface and is easy to use. This tool requires administrative privileges to check SSD speed. Hence, it always launches as an administrator.
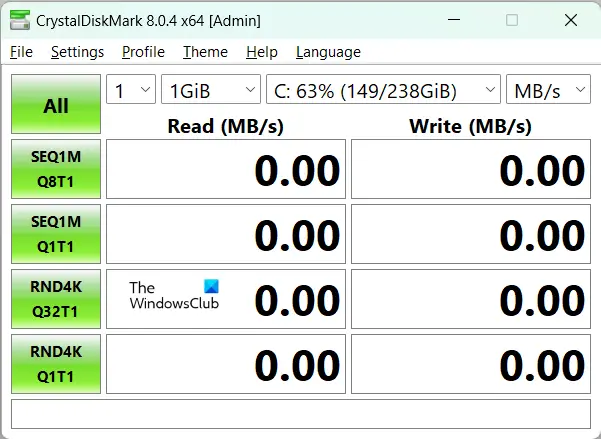
When you launch this tool, you will see the interface as shown in the above image. If the bus type of your SSD is NVMe, select NVMe in the Settings menu. Otherwise, select Default.
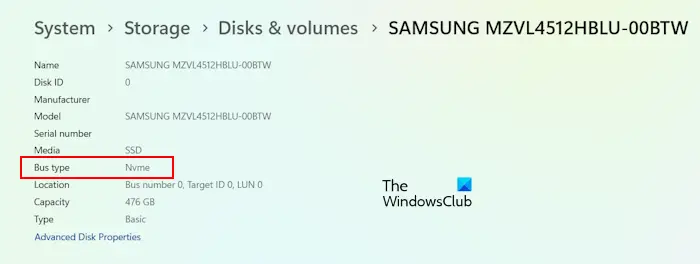
You can check this in your PC Settings. Open Settings and go to System > Storage > Disks & volumes. Select your SSD and click Properties. You will see the Bus type there.
For an NVMe SSD, it offers the following four types of test parameters:
- SEQ1M Q8T1
- SEQ128K Q32T1
- RND4K Q32T16
- RND4K Q1T1
For other SSDs, it offers the following four types of test parameters:
- SEQ1M Q8T1
- SEQ1M Q32T1
- RND4K Q32T1
- RND4K Q1T1
All these testing modes are available on the left side as green buttons. Let’s talk about the 4 drop-down menus available just above the Read and Write columns. The first drop-down menu has numbers from 1 to 9. These are the test counts. You can select the test counts from 1 to 9.
The second drop-down menu allows you to select the test size, ranging from 16 MiB to 64 GiB. Do note that MiB and GiB are not Megabytes and Gigabytes. These are Mebibytes and Gibibytes respectively.
The third drop-down menu allows you to select your hard drive. In the fourth drop-down menu, you can select the unit for displaying the result. By default, the unit is set to MB/s.
The CrystalDiskMark performs two types of tests on a hard drive, Sequential and Random. In the above parameters, SEQ indicates the Sequential test and RND indicates the Random test.
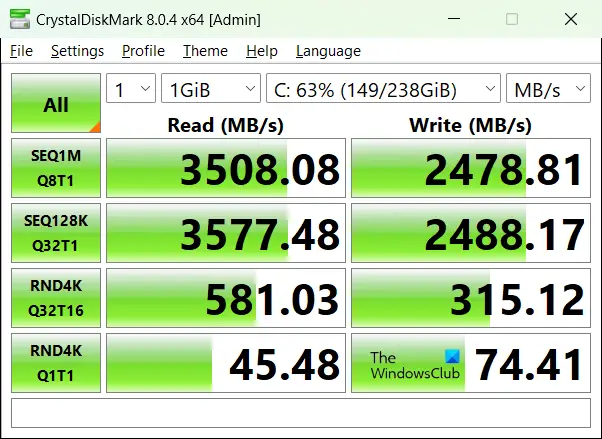
All the test parameters are different. For example, SEQ1M Q8T1 means a Sequential test with 1 MiB Block size, 8 Queue depth, and 1 Thread. RND4K Q32T1 means a Random test with 4 KiB Block size, 32 Queue depth, and 1 Thread.
Click on that parameter to check the SSD speed on a particular parameter. Otherwise, click All to test the speed of your SSD on all parameters. You can save the result as a PNG file and a Text file.
2] Use EaseUS Partition Master
EaseUS Partition Master Pro is a powerful tool that comes with a lot of features. This single tool allows you to manage your hard disk partitions, create new partitions on your hard disks, clone your hard disks, convert your hard disks, etc. You can also perform an SSD speed test using EaseUS Partition Master.
The following steps will guide you on how to use EaseUS Partition Master to test the speed and performance of your SSD.
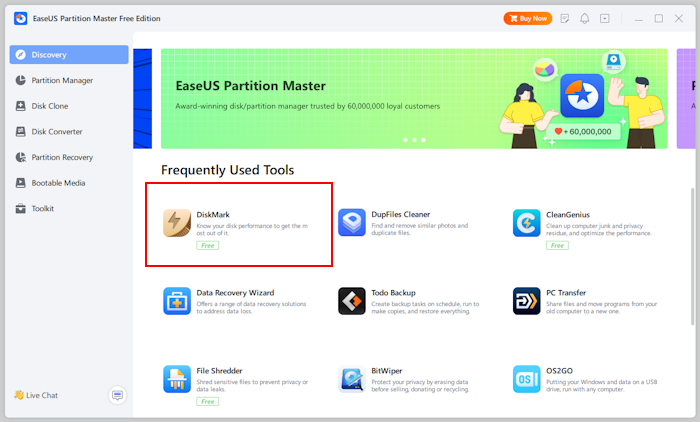
Launch EaseUS Partition Master and select the Discovery tab from the left side. Under the Frequently Used Tools section, download the DiskMark utility. DiskMark is a free utility of EaseUS Partition Master. Hence, any user can use it for an SSD performance test.
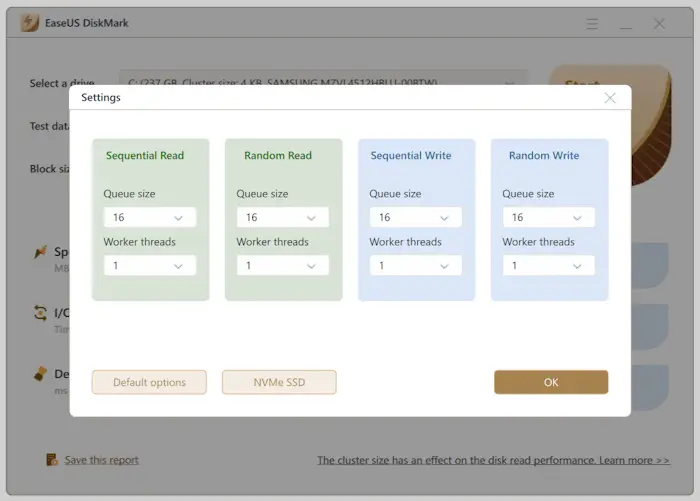
Now, launch the DiskMark utility. Select your hard drive, Test data, and Block size. You can select the Queue size and Worker threads in its settings. Open its settings by clicking on the three horizontal lines on the top right side. Here, you can also select your SSD type. If you have an NVMe SSD, select the NVMe SSD option; otherwise, select the Default option.
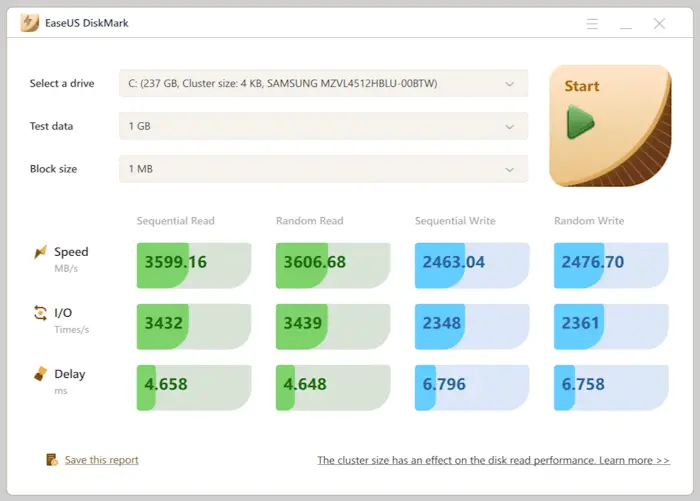
When you are done, click on the Start button. This test will put stress on your SSD. During the test, your SSD consumption will go to 100%. You can see this in the Task Manager.
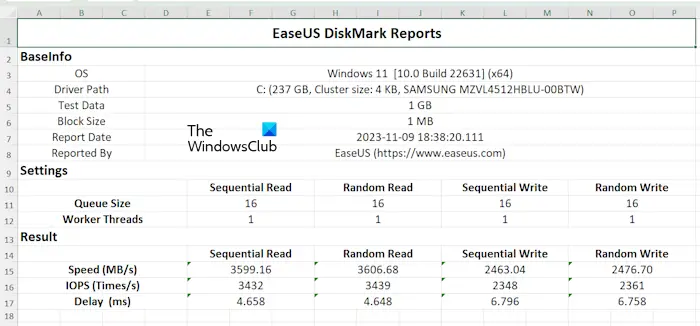
After the completion of the test, the EaseUS DiskMark utility will show you the results. You can save this report by clicking on the Save this report link. It saves the detailed report in xls format (supported by Microsoft Excel). The detailed report looks like as shown in the above image.
The EaseUS DiskMark utility is available in multiple languages.
3] Use Blackmagic Disk Speed Test
You can also use the Blackmagic Disk Speed Test software for your SSD performance test. It displays results in the following two columns:
- Will It Work?
- How Fast?
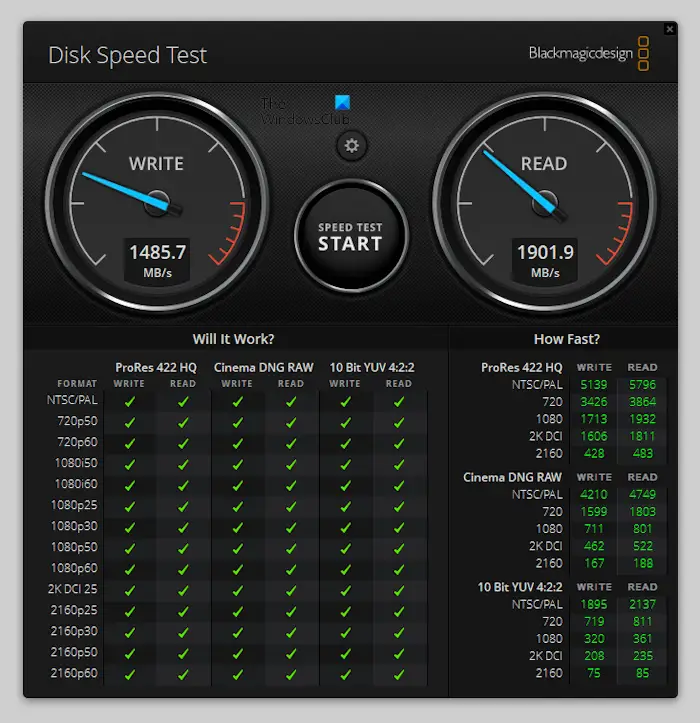
The “Will It Work?” column shows the supported video formats by your hard disk storage and the “How Fast?” column displays the SSD speed in FPS (Frame Per Second). In simple words, the “How Fast?” results panel shows how capable your SSD is to handle how many streams of video. For example, if the result for 1080 HD is 70, it means that your SD can run up to 70 frames per second of 1080p HD video.
Click on the Settings (gear-shaped) icon to select the target drive and file size for the stress test on your SSD. When you are done, click on the Start button. It will run tests for up to 8 seconds for both read and write speeds. You have to click on the Start button again to stop the test. It is suggested to stop the test after 8 seconds for best results.
Using Windows built-in Disk Speed Test tool
Windows computers also have a built-in disk speed test tool. It is a command line utility that you can run in the Administrator Command Prompt window.
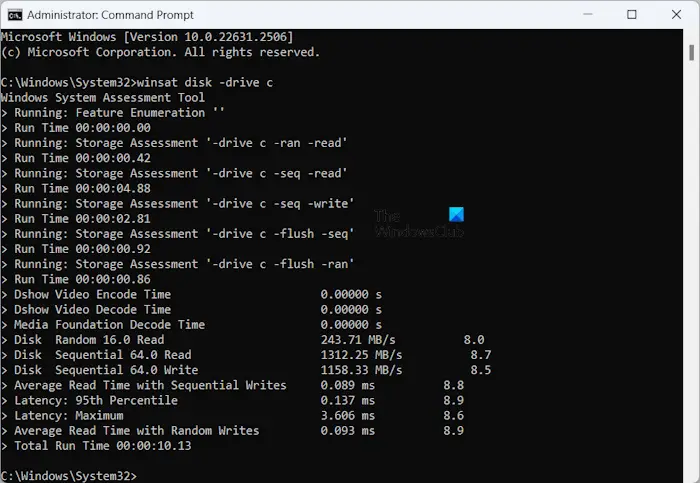
Launch the elevated Command Prompt and type the following command. After that, hit Enter.
winsat disk -drive c
The above command will take some time. After the execution of the above command, you will see the SSD speed test results.
Compare SSD speed test results and optimize SSD performance
SSD speed test software is helpful if you want to buy a new SSD. You can test whether it delivers the speed it claims or not. In addition to this, you can also compare the speed test results of different SSDs so you can purchase the right one for you. An SSD performance test is also helpful if you are experiencing slow performance of your computer. You can check whether your SSD is working fine or requires optimization.
When it comes to SSD speed, different types of SSDs offer different data transfer speeds. Usually, the average sequential read and write speeds of SATA SSDs are around 560 MB/s and 530 MB/s, respectively. The average sequential read and write speeds of NVMe SSDs are around 3500 MB/s and 3000 MB/s, respectively. The average sequential read and write speeds of PCIe 4th Generation SSDs are around 7000 MB/s and 5000 MB/s, respectively.
You can compare the test results with the exact speed of your SSD mentioned by the manufacturer. If there is a noticeable difference between the speeds, your SSD needs to be optimized. We have explained some steps to optimize an SSD for better performance.
Optimize an SSD performance
If you are experiencing slow performance of your Solid State Drive (SSD), you can optimize it to boost its performance.
First of all check for low space. If you keep a lot of data on your SSD, it will slow down its performance. Free up space on your SSD by deleting the unnecessary files to increase its performance.
Check if the TRIM command is enabled or not. If the TRIM command is enabled, Windows will send an instruction to your SSD every time you delete a file. This instruction will tell SSD to erase the file’s content automatically after the file deletion. Enable the TRIM command if it is not enabled.
Keep your SSD firmware up to date. Optimize your SSD with the help of the Windows built-in tool, Optimize Drives. Launch the tool and select your SSD. Now, click on the Optimize button.
SSD stores data in small blocks. These blocks are called sectors. If these sectors are not aligned properly, SSD will take more time to read and write data. Therefore, the alignment of sectors on an SSD is more important when it comes to increasing its read and write speed. 4K alignment boosts the performance of an SSD. Therefore, your SSD should be 4K aligned if you want to get maximum performance from your SSD.
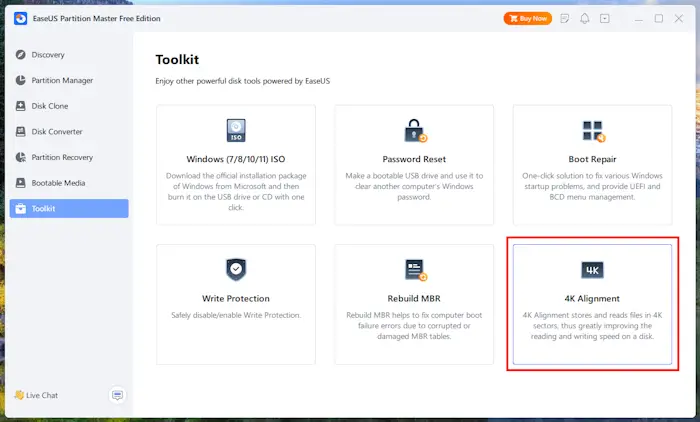
You can easily check this via the System Information. Launch System Information and select Components > Storage > Disks. Look for Partition Starting Offset. If the value is completely divisible by 4096, the sectors in your SSD are 4K aligned. If not, align the sectors in your SSD to 4K. EaseUS Partition Master can help you optimize your SSD with the 4K alignment to boost your computer performance.
Conclusion
We have seen how to test the speed of your SSD and how to optimize it to get the maximum performance. Windows also has a built-in Command line utility that allows you to check SSD speed but it lacks many advanced features that third-party SSD performance test software provides. With the help of third-party tools, like EaseUS Partition Master, you can not only test the speed of your SSD but also perform actions to increase its performance and speed.
You should also take care of some things to extend your SSD lifespan and optimize its performance, like avoiding extreme temperatures, avoiding power outages, keeping its firmware up to date, keeping free space in your SSD by deleting unnecessary files, etc.
Leave a Reply