One of the worst things about keeping a lot of work and home data is losing it. After all its hardware, and it can fail at times. Hard drives can stop working all of a sudden, NAS drivers can fail, or it could be accidental. There is a reason why people keep a backup of the backup. Today we are reviewing iBoysoft Data Recovery. It’s professional software that can recover deleted files, and the professional version also supports recovery from BitLocker Encrypted Drives.
iBoysoft Data Recovery review
Before we begin, I am going to outline the difference between Free, Home, and Professional versions. The free version allows you to recover up to 1GB of data. It supports Windows 10 and Windows Server. The Home version allows unlimited data recovery, while the Professional edition includes BitLocker data recovery. This post covers the following topics:
- Download and install iBoysoft Data Recovery
- Arrange for external storage or USB drive
- Select a Drive or Partition
- Find Deleted Files
- Recover Deleted Files
- Deep Scan
- Save Sessions or Search Result
- Extra Features
The offer to recover 1GB of data using the free version is excellent. Customers can evaluate the software, know that it works, and if their requirement goes beyond 1Gb, they can invest in the software with trust.
Recover deleted files from BitLocker Encrypted Drives
1] Download & install iBoysoft Data Recovery
First, download the iBoysoft Data Recovery and install it. In case you have enabled Protected folders in Windows 10, make sure to add the software to the exception list, or it will keep loading.
Launch the software, and when it loads, it will list all the connected drives and their partitions. You should see the amount of free storage, total capacity, reserved system drive, type of partition, and primary partition marked with the Windows icon. On the top left, you have the option to use Bitlocker Data Recovery and Find more partitions option. We will talk about them in the later section.
2] Arrange for external storage or USB drive
Before we start the recovery process, here is how to prepare for it. I would strongly suggest using an external drive or a USB to export the deleted files you find using the software. The reason is simple. If you export the data to the same drive, it will overwrite existing space, and reduce the chance of finding the deleted data. You may suggest exporting data to another partition, but what if you need to recover data from there as well.
3] Select a Drive or Partition
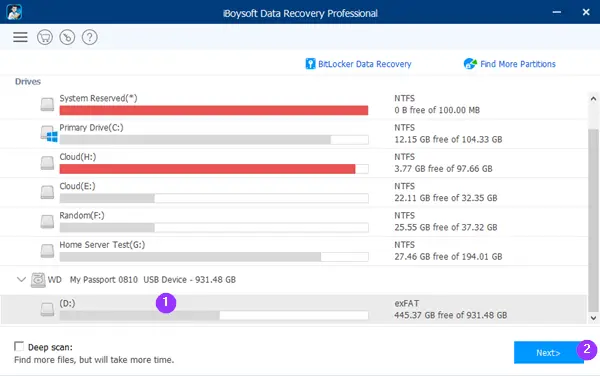
From the hard drive list, select one of the storage, and then click on Next. On the same screen, you have an option to check the box that says, “Deep Scan,” you can use it so the software can dig deeper for lost data. Deep scan takes a lot of time, and until you have that amount of time, I would suggest to use it later. Running the regular scan might reveal the files you had deleted, especially if it was recent.
4] Find Deleted Files
As soon as you click on the Next button, it will take the regular scan, which finishes quickly. The result screen has two sections. On the left, you get file explorer like tree structure to navigate between folders, while the right part displays the list of files of the selected folder.
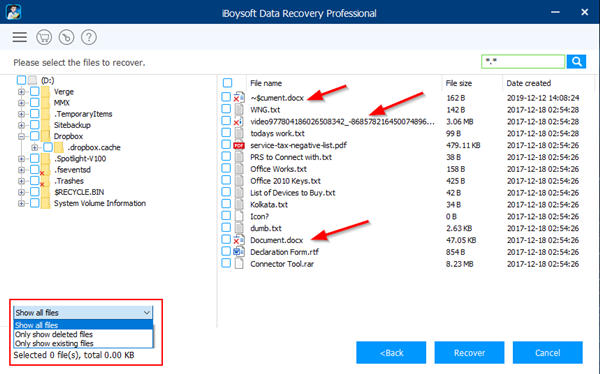
Don’t get surprised if you see all the folders, including the one which is available on the partition or drive. What you need to notice are files that have a red cross on the bottom right of the icon. These are the files that have been deleted. On the top right, you get a search box, which will make it easy to find a file if the list is too long.
Another way to filter out the clutter is by using the drop-down available at the bottom left. You can click on Show all files, and choose to display only deleted files.
5] Recover Deleted Files
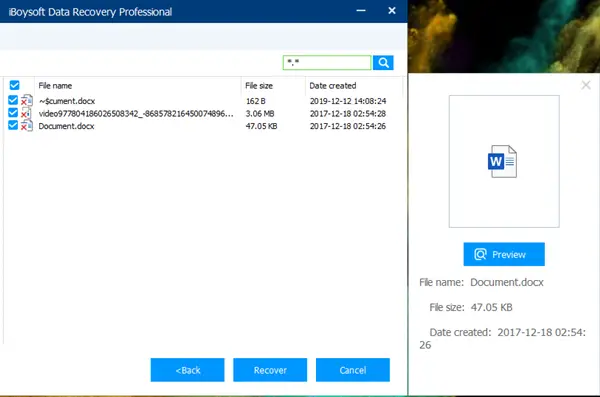
Now that you have found the deleted files, its time to recover it. Once again, I would remind you to recover data on a different drive than on the same drive.
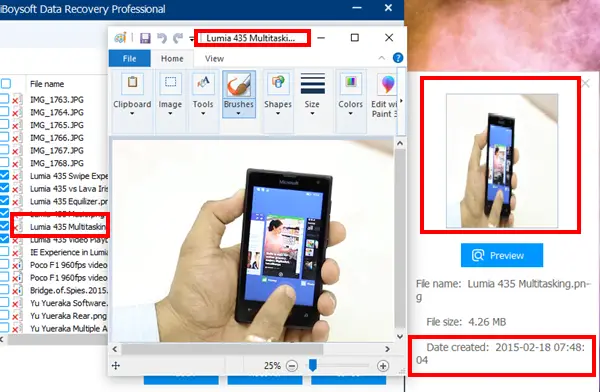
- Click on the file, and it will give you an option to see a preview of the file. You can also see the file size, date created, and other details.
- Once you are sure, click on the Recover button, and choose where a location where the fils will be exported.
- Export may take its time depending on the size of the files you choose to recover.
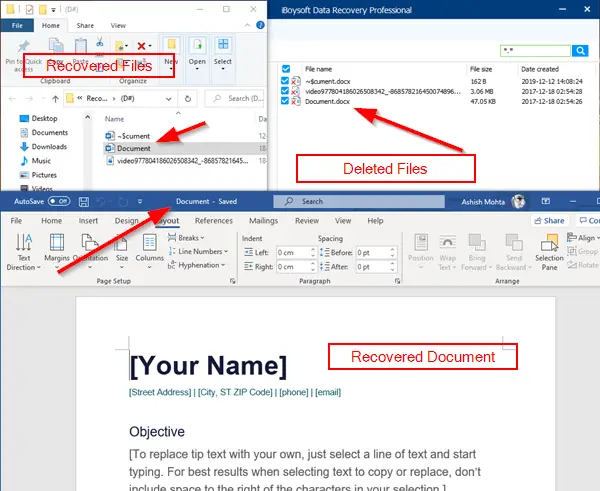
- Once done, it will open the folder where the files are available.
Below is an example of how I recovered a deleted file from my external storage, which I lost last year, but since I had never used this drive, recovery was easy.
6] Deep Scan
If you are unable to find your file using the regular scan, its time, you check the Deep Scan box and then start the scanning process. The search process using this method is different from the usual way. Deep Scan uses RAW searching technology.
- It scans the unallocated space sector by sector to find files which have not been overwritten
- Identifies these files by unique headers and footer of the unallocated cluster
- Recovers data with old names and folder structures.
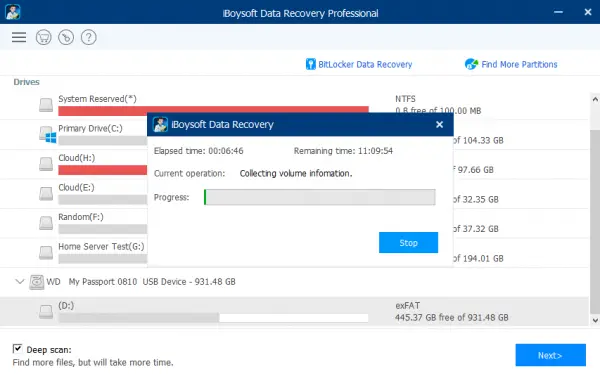
If you have a hard drive that is not working correctly or have been formatted or where the standard scan gets stuck, we highly recommend you to use a Deep scan to find the files. Trust it; it will take a lot of time, so run it during the night, and make sure PC is set not to sleep.
The good thing about Deep Scan is that even if abort it in the middle, it will reveal a list of files that it found and recoverable. Here is what happened to me. I was able to recover a file that I deleted a couple of years back.
It’s impressive!
7] Save Sessions or Search Result
If you want to recover files later, and want to save the search result, also called sessions, then you can do that. Once you have the search result, click on the hamburger menu and click on Save session. Anytime you want to load, launch the software, and use the menu to load the session. If the drive which was scanned in that session is available, you can start from where you left.
8] Extra Features in Professional Version
That covered, I will quickly share two important features of the software.
Recovery from BitLocker Encrypted Drives
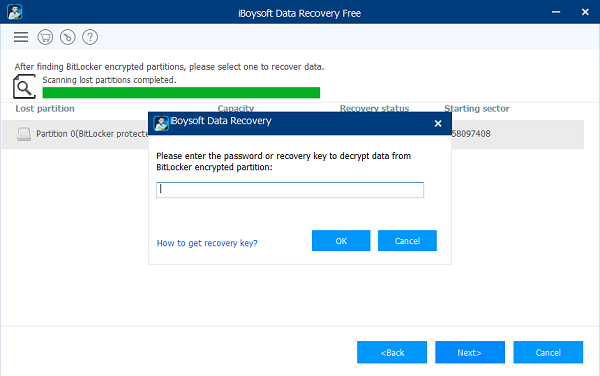
If a drive from which you are recovering file was encrypted using Bitlocker, you could recover data from that too. However, you will need the key with which the data was encrypted. Since the drive is no more connected to the Windows OS, using BitLocker data recovery, you can still extract the data.
- Connect the drive, and click on BitLocker Data recovery
- The software will find drives or partition which is encrypted using Bitlocker
- As soon as you click on next to start recovery, it will prompt for the key.
- Once the key is verified, the recovery process is similar to what we have already seen.
Find more Partitions to recover data from deleted/lost partitions
If you have accidentally deleted partitions, then you use this option to find them, and retrieve data from it. The software will scan the drive for any unallocated partition, and then scan to find deleted files.
That sums up the iBoysoft Data Recovery software features for all the versions. I have to say that the software impressive and straightforward to use, and it works. If you are looking to recover a small set of files, then the free version is enough else you can always choose the Home or Professional version depending on your need.