Screenshots have become an integral part of our day to day tasks. What is a better way to share some information than sharing the entire screen? If you make some tutorials, software reviews or if you are a developer, screenshots might be a daily activity for you. And having a dedicated tool just to handle screenshots and video captures is pretty amazing. Ashampoo Snap 10 is one such great screenshot software that lets you take screenshots, record screen into a video and do much more.
Ashampoo Snap Review
I was pretty mesmerized by the way it handled complex tasks. I mean you could record your computer, edit the video and publish it in just seconds. The simplicity and minimalistic look of the UI makes your experience even better. Once you’ve installed and started the program, you can notice a slim blue line in the top right area of your screen. Hovering over that will open the quick actions menu. This menu lets you capture screenshots and videos instantly and on the go.
Screenshots
There are a few modes that the program supports capturing in, all of them are discussed here in detail. Once you’ve taken the screenshot, the program enters the edit mode which lets you make changes and modifications to the image or the video. Edit mode and its various features have been discussed later in the post.
![]()
Capture Single Window
This the most widely used operation and lets you capture an entire window or some parts of it. You can capture just the menu bar or the ribbon in office applications or just the entire window. The tool provides on-screen instructions to capture screenshots.
Capture Free Rectangle Region
This mode lets you define a rectangle on the screen and capture a specific area of the screen.
Capture Freestyle Region
Move your mouse around in any shape and capture in whatever area you want.
Capture Fixed Region
Select the dimensions of the area from a drop down and move it around to capture an area with fixed dimensions.
Capture Scrolling Window
This mode is pretty amazing, you can define and fix some area on the screen. Now when you start capturing, scroll down to capture a long screenshot. Using this mode you can capture long lists and whatever that is scrollable.
Capture Internet Explorer/Chrome Window
Capture a complete website already opened in your web browser. Just open your desired website, enter into this capturing mode and left click to start capturing. Ashampoo Snap will automatically scroll through the entire page and capture a long screenshot covering entire web page.
Capture Menu
Well, this mode lets you capture menus without actually taking a complete screenshot.
Videos
Ashampoo Snap 10 also comes with screen recording capabilities because that is what makes a tool complete. The video mode comes with extensive features, you can capture a single window, primary monitor, all monitors, a rectangular region and even webcam. Moreover, you can provide an audio source so that you can also record your voice along with the video.

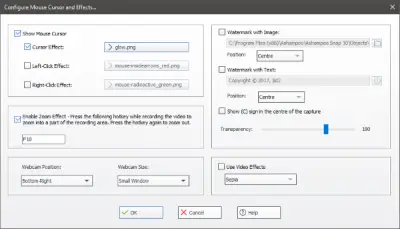
There are a few other options available as well. You can toggle mouse cursor visibility or enable graphics for pressed keys. And you can change cursor effects along with right-clicking and left-clicking effects. These effects can be enabled so that the clicks are properly understandable in the video. Video Effects and Watermarks can be enabled as well. You can add watermarks with images as well as text. There is also an option to display webcam input along with screen recording. You can choose the webcam position and size on the video canvas.

Edit Mode
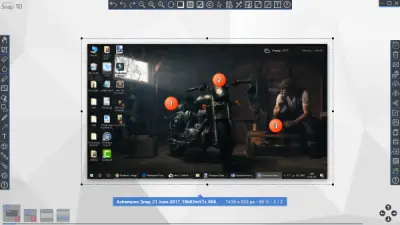
Enough about capturing screen in various modes, now let’s check out how to edit and modify your captured images and videos. The edit mode is bounded by three bars, ‘Action Bar’ on the right, ‘Tools Bar’ on the left and ‘Image Bar’ on top.

Tools Bar
As the name suggests, the bar gives access to the most common tools you would need while editing your screenshots. There is an eraser, blur and a marker tool available. Moreover, you can highlight and flood fill different areas of the screenshot. You can also add shapes and draw anything with the pencil tool.
If you are creating documentation screenshots then the arrow and text tool will help you a lot. You can also add numbering for different steps and even highlight a small area using the spotlight effect.
Image Bar
This bar includes all the simple tools that you will need to change your image’s properties in whole. You can undo and redo changes, zoom in/out and rotate the image. Moreover, you can apply Drop Shadow, Fade and add a border to the screenshot. The image can be resized, watermarks and timestamps can also be applied from this bar.
An amazing feature of Ashampoo Snap is that it captures cursor separately while taking the screenshot. So, you can essentially change the position of pointer even after the screenshot has been taken. You can completely delete the mouse cursor or move it around at a desired location on the screenshot.
Action Bar
Action Bar lets you perform various actions on the image like saving it or publishing it. You can save the capture, or directly send it via email. You can also upload the snapshot to the cloud or social platforms like Facebook/Twitter with just a click. Or you can copy the snapshot path or export it to another folder. You can even export the snapshot do Adobe Photoshop directly. The action bar is all you need to finally save the snapshot.
The program features a similar edit mode for videos and lets you perform some basic operations on the videos so that they are ready to be published.
Ashampoo Snap is a great screenshot suite. If you are a blogger or if take a lot of screenshots then this might be the perfect tool for you. Or if you are creating a documentation for your product, this program has all the features to ease your task. I believe it is one of the best screen recording tools available.
Buy Ashampoo Snap at a whopping discount!
Ashampoo Snap costs around $39.99 but we’ve arranged a huge 50% discount exclusively for our readers. Go here to buy Ashampoo Snap 10.